Introduction
Overview
SDialog is a modular Python toolkit for generating, steering, evaluating, and analyzing synthetic dialogues with instruction-tuned Large Language Models (LLMs). It standardizes core abstractions (Dialog, Turn, Event, Persona, Context, Agent, BaseOrchestrator) and supplies composable components for:
Persona-driven multi-agent role-play
Dynamic orchestration (rule / probabilistic / semantic response suggestion)
Attribute & dialogue generation (LLM + light rule hybrids)
Evaluation (linguistic, flow / coherence, embedding similarity, LLM judges)
Mechanistic interpretability & activation steering
Dataset integration (e.g. STAR) and reproducible experiment pipelines
If you are building controlled conversational simulations, benchmarking dialog models, producing synthetic training corpora, or probing internal model behavior, SDialog provides an end-to-end workflow.
Architecture at a Glance
SDialog is divided into many submodules, each depicted as a circle in the below diagram describing the overall architecture:
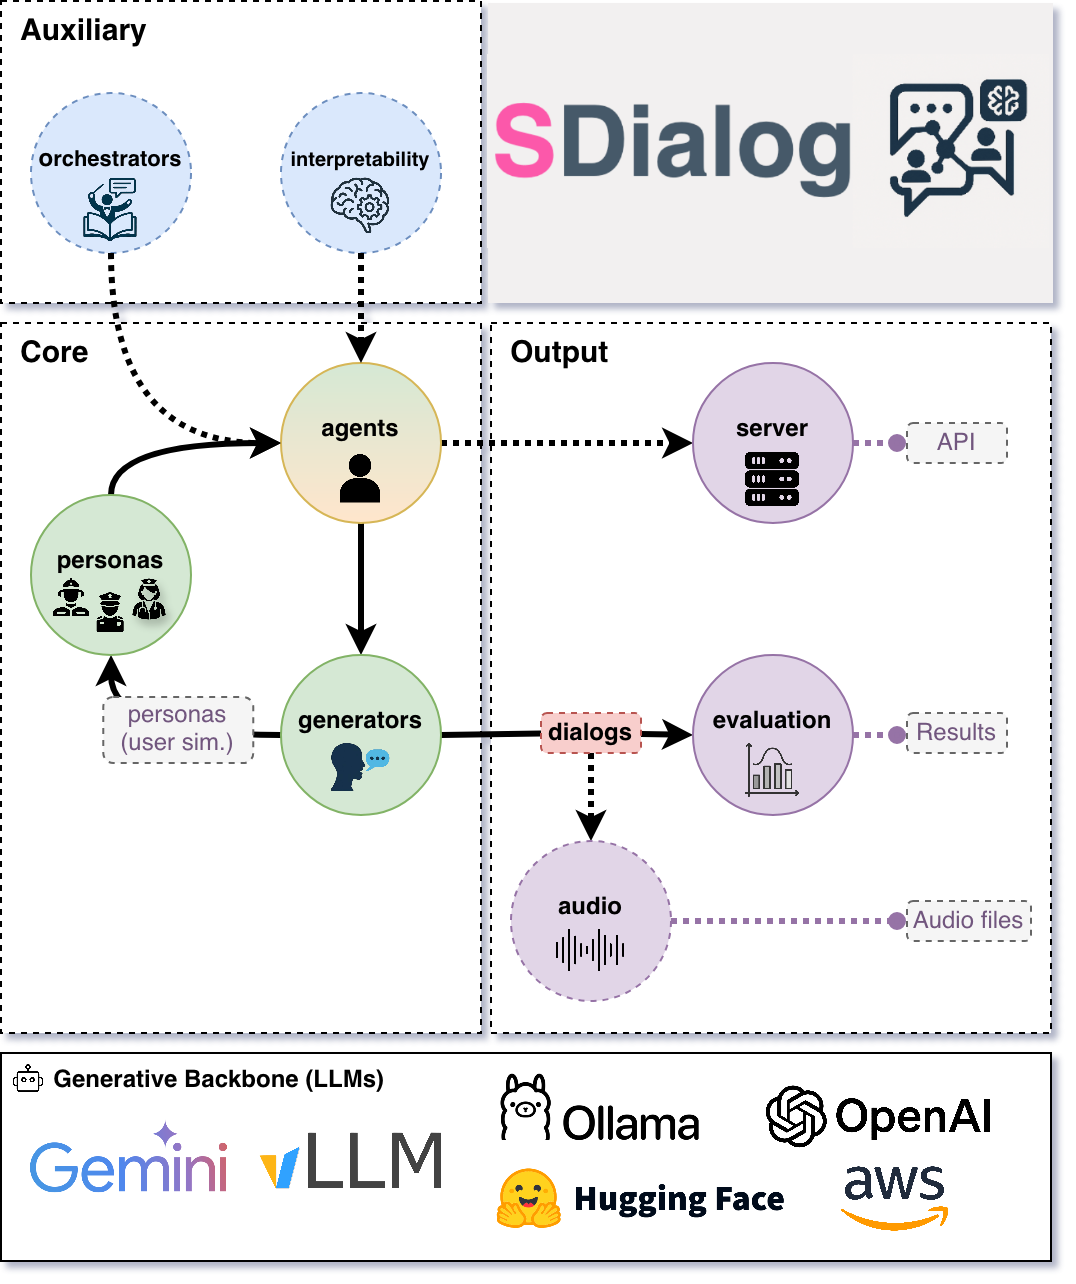
Note: Attribute & Dialog generators may produce Personas / Contexts / prototype Dialogs that seed Agents; Agents then produce the canonical Dialog objects evaluated downstream.
Core Concepts
Dialog
A Dialog object contains an ordered list of Turn instances and an optional list of Event objects, plus metadata and utility methods:
Turn: Has
speakerandtextfields.Event: Generic action record (utterance, instruction, tool invocation, etc.).
Metadata: Provenance for reproducibility (version, timestamp, id, parentId, seed, model, etc.).
Methods: Text transforms at dialog level (
lower(),upper(),replace(),re_sub(), etc.), utilities (prompt(),rename_speaker(),filter(),get_speakers(), etc.), serialization (to_file(),from_file()), cloning with lineage (clone()), andlength()estimation (words / turns / minutes).
Creating Dialog from Text:
Dialog objects can be created programmatically, but let’s explore how we can also easily create them from plain text! Whether you have a string or a text file, we can use the convenient from_str() or from_file() methods respectively.
Both methods accept the same arguments and Dialog.from_str(text) is equivalent to Dialog.from_file("file.txt") when the file contains plain text.
Let’s walk through three common scenarios you might encounter:
from sdialog import Dialog, Turn

# 1) Basic usage - Text in default "{speaker}: {text}" format
dialog_text = """Alice: Hello there! How are you today?
Bob: I'm doing great, thanks for asking.
Alice: That's wonderful to hear!
Bob: What about you? How's your day going?"""

dialog = Dialog.from_str(dialog_text)
dialog.print()

# 2) Text in custom format
chat_log = """[2024-01-15 14:30] @user123: Hey everyone!
[2024-01-15 14:31] @moderator: Welcome to the chat
[2024-01-15 14:32] @user123: Thanks, excited to be here!
[2024-01-15 14:33] @helper_bot: How can I assist you today?"""

# Define your custom template to parse each turn
dialog_from_chat = Dialog.from_str(
    chat_log,
    template="[{timestamp}] @{speaker}: {text}"
)
dialog_from_chat.print()

# 3) Text with no speaker tags
simple_conversation = """Hello there!
Hi, how are you?
I'm doing well, thanks!
That's great to hear."""

# Provide default speakers to assign alternately
dialog_with_defaults = Dialog.from_str(
    simple_conversation,
    template="{text}",  # No speaker in text turns
    default_speakers=["Alice", "Bob"]  # Alternating assignment
)
dialog_with_defaults.print()
Operations Example:
Now that we understand how to create dialogs, let’s explore the powerful operations we can perform with them! Here’s a hands-on walkthrough demonstrating common Dialog manipulations we’ll be working with—creating a dialog programmatically, slicing (which preserves lineage), chaining text transformations, selective speaker filtering, speaker renaming, length/statistics queries, and safe iteration over derived copies.
from sdialog import Dialog, Turn

# Let's first create a sample dialog programatically
dialog = Dialog(turns=[
    Turn(speaker="Alice", text="Hello there! How are you doing today?"),
    Turn(speaker="Bob", text="I'm doing great, thanks for asking."),
    Turn(speaker="Alice", text="That's wonderful to hear!"),
    Turn(speaker="Bob", text="What about you? How's YOUR DAY going?")
])

# Slicing creates new Dialog with fresh ID and parentId linkage
first_half = dialog[:2]  # First 2 turns → new Dialog with dialog.id as parentId
print(f"Original ID: {dialog.id}")
print(f"Slice ID: {first_half.id}, Parent: {first_half.parentId}")

# Text transformations examples
normalized = dialog.lower().replace("!", ".")             # Chain operations
filtered_alice = dialog.filter("Alice")                   # Only Alice's turns
dialog_alicia = dialog.rename_speaker("Alice", "Alicia")  # Rename speaker

# Print some information
print(f"Length: {len(dialog)} turns")  # len(dialog) == dialog.length('turns')
print(f"Length: {dialog.length('words')} words, approx. {dialog.length('time')} minutes")
print(f"Speakers: {dialog.get_speakers()}")

# Iterate over dialog turns
for ix, turn in enumerate(dialog_alicia):
    print(f"Turn {ix+1}: {turn.speaker} - {turn.text}")

# Save to JSON with metadata
dialog_alicia.to_file("dialog_alicia.json")
Personas & Context
Personas are structured, typed attribute bundles that specify role, style, goals, background knowledge, and behavioral constraints used to condition LLM prompts for Agents in a reproducible, inspectable way. Context objects complement Personas with shared situational grounding so multiple agents can coordinate.
SDialog formalizes this socio-cognitive conditioning through attribute models:
Persona / ExtendedPersona (
Persona,ExtendedPersona): Baseline and expanded demographic + behavioral traits.Domain-specific Personas:
Customer Service:
Customer,SupportAgentHealthcare:
Patient,ExtendedPatient,Doctor,ExtendedDoctor,Nurse,Pharmacist,CaregiverEducation:
Teacher,Student,AcademicAdvisorFinance:
FinancialAdvisor,Banker,InsuranceAgentRetail:
StoreManager,SalesAssociate,ShopperTravel/Hospitality:
HotelReceptionist,TravelAgent,TouristLegal:
Lawyer,Paralegal,LegalClientTechnical Support:
ITSupportSpecialist,HelpdeskTechnician,EndUserGovernment/Public Service:
CivilServant,SocialWorker,CitizenFood Service:
Chef,Waiter,RestaurantCustomer
All inherit BaseAttributeModel and, as such, they support:
Cloning with lineage tracking (
clone()).Serialization and I/O methods (
json(),prompt(),to_file(),from_file()).
Creating your own Personas:
Sometimes the built-in personas don’t quite fit your specific use case—and that’s perfectly fine! Let’s create custom personas by inheriting from BasePersona (equivalent to BaseAttributeModel) or from any existing persona class to extend it further.
from sdialog.personas import BasePersona

class TravelAgentPersona(BasePersona):
    role: str = ""
    expertise: str = ""
    tone: str = ""
    goals: str = ""
    constraints: str = "Make sure to provide realistic travel options"

# Instantiate with defaults or override specific attributes
my_persona = TravelAgentPersona(
    role="Travel Agent",
    expertise="European rail itineraries",
    tone="friendly and concise",
    goals="suggest routes, optimize cost",
)
my_persona.print()  # Pretty-print my travel agent persona

# Clone with overrides while preserving lineage metadata
variant = my_persona.clone(tone="enthusiastic and energetic")
assert variant.parentId == my_persona.id
Advanced Persona Creation with Field Documentation:
Here’s where things get even more interesting! We can use Pydantic Field descriptions to document each attribute in our custom persona. These descriptions serve as guides for LLMs when generating persona objects via PersonaGenerator. Let’s see this in action:
from sdialog.generators import PersonaGenerator
from sdialog.personas import BasePersona
from pydantic import Field


class TravelAgentPersona(BasePersona):
    role: str = Field("", description="The role of the persona, for example 'Travel Agent' or 'Tour Guide'")
    expertise: str = Field("", description="The area of expertise")
    tone: str = Field("", description="The tone of the persona")
    goals: str = Field("", description="A short description of the goals")
    constraints: str = Field("", description="Operational constraints, e.g., 'budget limitations'")

# Alternatively, use PersonaGenerator to create personas based on field descriptions
generator = PersonaGenerator(TravelAgentPersona, model="openai:gpt-4")
generated_persona = generator.generate()
generated_persona.print()  # Pretty-print the generated travel agent persona
Agents & Orchestration
Agents
Agent encapsulates an LLM-backed conversational actor:
Features:
Persona + optional Context + exemplar Dialogs → prompt assembly.
Memory (list of role-tagged messages) with additive system instructions.
First utterance selection (fixed or random from list).
Orchestrator pipeline (dynamic instruction injection).
Optional tools (callable functions) integrated into LLM responses (if backend supports function/tool calling).
Optional “thinking” (hidden reasoning segments) extraction & filtering.
Lookahead capability (
response_lookahead()) without mutating memory.JSON serialization of configuration and persona.
Key Methods:
__call__(): invoke the agent with a message and get a response (e.g.resp = agent("Hello!")).dialog_with()/ aliastalk_with(): multi-turn role-play.instruct(): inject immediate or persistent system instructions.add_orchestrators()/ pipeline composition viaagent | orchestrator.add_inspectors()oragent | inspectorfor activation capture (mechanistic interpretability).reset(): reproducible restart to mark the beginning of a new conversation.memory_dump(): snapshot conversation for logging.prompt(): get the underlying system prompt used by the agent.json(): export the agent as a JSON object.
Orchestration
Orchestrators are lightweight controllers that examine the current dialog state and the last utterance from the other agent, optionally returning an instruction. They can be ephemeral (one-time) or persistent (lasting across multiple turns). Orchestrators are composed using the pipe operator:
# Instantiate orchestrators first
length_orch = LengthOrchestrator(min=8, max=12)
reflex_orch = SimpleReflexOrchestrator(
    condition=lambda utt: "confused" in utt.lower() or "don't understand" in utt.lower(),
    instruction="Slow down and explain with a concrete example to clarify."
)
agent = agent | length_orch | reflex_orch
Built-in Orchestrators:
SimpleReflexOrchestrator: condition trigger in input utterance → fixed instruction for the agent to generate the response.LengthOrchestrator: enforce min length / encourage wrap at max.ChangeMindOrchestrator: probabilistic revision injection (limited times).SimpleResponseOrchestrator: semantic similarity suggestions from canned responses / action graph.InstructionListOrchestrator: deterministic scripted step sequence.
Creating your own Orchestrators:
Ready to build your own orchestration logic? You can create custom orchestrators by inheriting from BaseOrchestrator (for one-time instructions) or BasePersistentOrchestrator (for persistent instructions). The key is implementing the instruct(self, dialog, utterance) method to define your orchestration logic. The method receives the current Dialog and the last utterance from the opposite agent (or None if it’s the first turn).
Let’s explore both types with practical examples:
One-time Orchestrator Example:
from sdialog.orchestrators import BaseOrchestrator

class EmpathyBooster(BaseOrchestrator):
    def __init__(self, emotion_keywords):
        self.emotion_keywords = emotion_keywords

    def instruct(self, dialog, utterance):
        if utterance and any(keyword in utterance.lower() for keyword in self.emotion_keywords):
            return ("The user seems to be experiencing difficult emotions. "
                    "Acknowledge their feelings with empathy and offer gentle support.")
        return None

empathy_booster = EmpathyBooster(["worried", "stressed", "frustrated",
                                  "upset", "anxious", "sad", "disappointed", "overwhelmed"])
agent = agent | empathy_booster
Persistent Orchestrator Example:
This simple example shows the minimal pattern: return an instruction once when a condition is first met; the instruction then persists automatically in the agent’s system messages and does not need to be returned again. A more advanced “LLM-as-a-Judge”-based persistent orchestrator is provided here.
from sdialog.orchestrators import BasePersistentOrchestrator

class EarlyRecapOrchestrator(BasePersistentOrchestrator):
    """Inject one persistent instruction once it's clear the user is asking too many questions."""
    def __init__(self, question_threshold=3):
        super().__init__()
        self.question_threshold = question_threshold
        self.instructed = False

    def instruct(self, dialog, utterance):
        if self.instructed or len(dialog.turns) < 4:
            return None
        # Count '?' in all turns from the other speaker (not this agent)
        other_qmarks = sum(t.text.count('?') for t in dialog.turns
                           if t.speaker.lower() != self.agent.name.lower())
        if other_qmarks >= self.question_threshold:
            self.instructed = True
            return ("From now on begin each reply with a concise bullet-style recap of the key questions so far, "
                    "then answer the latest question directly, and ask ONE clarifying follow-up only if needed.")
        return None

    def reset(self):  # allow reuse in later conversations
        super().reset()
        self.instructed = False

recap_orch = EarlyRecapOrchestrator(question_threshold=3)
agent = agent | recap_orch
Serving Agents via REST API
You can expose any Agent over an OpenAI/Ollama-compatible REST API using the serve() method to talk to it from tools like Open WebUI, Ollama GUI, or simple HTTP clients.
from sdialog.agents import Agent

# Let's create an example agent
support = Agent(name="Support")

# And serve it on port 1333 (default host 0.0.0.0)
support.serve(port=1333)
# Connect client to base URL localhost:1333
For example, to run Open WebUI in docker locally, just set OLLAMA_BASE_URL to point to port 1333 in the same machine when launching the container:
docker run -d -e OLLAMA_BASE_URL=http://host.docker.internal:1333 \
              -p 3030:8080 \
              -v open-webui:/app/backend/data --name open-webui \
              --restart always ghcr.io/open-webui/open-webui:main
Then open http://localhost:3030 in your browser to chat with the agent!
For serving multiple agents under a single endpoint, use Server’s serve(), as in the following example:
from sdialog.agents import Agent
from sdialog.server import Server

# Create multiple agents
agent1 = Agent(name="AgentOne")
agent2 = Agent(name="AgentTwo")

# Serve both agents on port 1333 (select them by name from the GUI)
Server.serve([agent1, agent2], port=1333)
Generation
Generation Components
The generation system in SDialog provides powerful tools for creating synthetic content at different levels of complexity. Whether you need to generate individual personas, contextual settings, or complete dialogues, these components work together to produce diverse and realistic outputs.
Attribute Generators
Let’s dive into one of SDialog’s most powerful features! Attribute generators combine LLM intelligence with rule-based patterns to create structured objects with randomized or AI-generated content. They are perfect for creating diverse personas and contexts for your dialogue simulations.
Both generators derive from BaseAttributeModelGenerator and support flexible attribute generation rules:
PersonaGenerator (PersonaGenerator)
Creates diverse character profiles with demographic, behavioral, and professional attributes. Ideal for generating varied participants in dialogue scenarios.
Let’s see how we can create teacher personas using only attributes defined in personas.py. For example, we can generate teachers with different subjects and years of experience:
import random
from sdialog.personas import Teacher
from sdialog.generators import PersonaGenerator

# Define a custom function to sample communication style based on years of experience
def get_communication_style(years_experience=None, **kwargs):
    # Example: simple mapping for demonstration
    if not years_experience:
        return "clear"
    return "enthusiastic" if years_experience < 10 else "authoritative"

# 1) Create a generator for teacher personas
teacher_gen = PersonaGenerator(Teacher)

# 2) Setup generation with interdependent attributes
teacher_gen.set(
    subject=["mathematics", "history", "biology"],
    years_experience="{2-25}",
    communication_style=get_communication_style,  # Depends on years_experience
    politeness=["polite", "neutral", "strict"]
)

# 3) Generate diverse teachers with contextually appropriate communication styles
teacher1 = teacher_gen.generate()
teacher2 = teacher_gen.generate()

# 4) Let's generate 3 more teachers in one shot
teachers_batch = teacher_gen.generate(n=3)  # Returns list of 3 teachers
- ContextGenerator (
ContextGenerator) Generates rich contextual frameworks that define the setting, environment, and situational constraints for dialogues. Essential for creating realistic and consistent conversation backgrounds.
Now let’s create varied classroom contexts to set the stage for our educational conversations:
from sdialog import Context
from sdialog.generators import ContextGenerator

# Create varied classroom contexts
ctx_gen = ContextGenerator(Context(location="classroom"))
ctx_gen.set(
    environment="{llm:Describe a realistic educational environment}",
    constraints=["time pressure", "distraction", "group activity"]
)
context = ctx_gen.generate()
Attribute Rule Patterns
The set() method accepts various rule types for flexible content generation:
LLM Delegation:
"*"or"{llm}"- Let the AI decide the value (default)Guided LLM:
"{llm:Create a professional background}"- AI with specific instructionsNumeric Ranges:
"{5-25}"- Random integer between bounds (inclusive)File Sources:
"{txt:names.txt}"- Random line from text fileData Tables:
"{csv:specialty:doctors.csv}"- Random value from CSV/TSV columnPython Functions:
callable(**attributes)- Execute function (receives partial object if compatible)Choice Lists:
["option1", "option2"]- Random selection from listFixed Values:
"specific_value"- Direct assignment
Dialogue Generators
Now let’s move on to creating complete conversations! Dialogue generators create full dialogues using different approaches, from direct LLM instruction to sophisticated persona-driven interactions.
- DialogGenerator (
DialogGenerator) The foundational dialogue generator that creates conversations based on free-form instructions. Great for quick prototyping and simple dialogue generation tasks.
Let’s start with a simple example—generating a medical consultation:
from sdialog.generators import DialogGenerator

# Generate a consultation dialogue
gen = DialogGenerator("Generate a brief medical consultation about headaches")

dialog = gen.generate()
dialog.print()
- PersonaDialogGenerator (
PersonaDialogGenerator) Creates sophisticated dialogues by having two distinct personas or agents interact naturally. This generator produces more realistic and character-consistent conversations.
Here’s how we can create a dialogue between a mentor and student with their unique characteristics:
from sdialog.personas import Teacher, Student
from sdialog.generators import PersonaDialogGenerator

teacher = Teacher(name="Ms. Lee", subject="mathematics")
student = Student(name="Alex", interests="algebra")

# Generate persona-driven dialogue
gen = PersonaDialogGenerator(
    teacher, student,
    dialogue_details="Discuss learning challenges and provide guidance"
)

dialog = gen.generate()
dialog.print()
- Paraphraser (
Paraphraser) Transforms existing dialogues following user-provided instructions. Useful for improving synthetic dialogues, adapting content for different styles, or data augmentation.
Let’s see how we can make automated responses sound more natural and empathetic:
from sdialog.generators import Paraphraser

# Make bot responses sound more natural
paraphraser = Paraphraser(
    extra_instructions="Make responses sound more empathetic and natural",
    target_speaker="Bot"  # Only paraphrase "Bot"'s turns
)

improved_dialog = paraphraser(original_dialog)
improved_dialog.print()
Reproducibility & Seeding
Every generation entry point accepts seed where feasible. Metadata persists seed and model so output artifacts remain auditable. Identical model + parameters + seed ⇒ deterministic attribute choices & (backend permitting) stable dialog trajectories. Use clone(new_id=...) to branch derived objects with recorded lineage.
Evaluation & Interpretability
Evaluation Suite
Categories:
Linguistic / Readability:
LinguisticFeatureScore- mean-turn-length, hesitation-rate, gunning-fog, flesch-reading-ease.Flow Graph Based:
DialogFlowScore(likelihood) &DialogFlowPPL(perplexity-like) against reference dialog graph.Embedding Similarity:
SentenceTransformerDialogEmbedder+ evaluators such asReferenceCentroidEmbeddingEvaluator.Distribution Divergence (score-level):
KDEDistanceEvaluator,FrechetDistanceEvaluator.- LLM Judges: Binary or numeric scoring with structured output
Specialized:
LLMJudgeRealDialog, Likert variant (LLMJudgeRealDialogLikertScore), numeric range variant (LLMJudgeRealDialogScore),LLMJudgeRefusal,LLMJudgePersonaAttributes.
Advanced Embedding Evaluators:
FrechetBERTDistanceEvaluator(Fréchet distance with BERT embeddings),PrecisionRecallDistanceEvaluator(Precision-Recall curves based on BERT).Dataset Aggregators:
DatasetComparatorto compare multiple evaluators.Statistics / Frequency:
StatsEvaluator(mean/std/min/max/median),MeanEvaluator,FrequencyEvaluator.
Evaluation Examples:
Let’s explore how to evaluate our generated dialogues using SDialog’s comprehensive evaluation suite. We’ll walk through different evaluation approaches to assess dialogue quality from multiple perspectives:
from sdialog.evaluation import (
    LinguisticFeatureScore, DialogFlowScore, LLMJudgeRealDialog, LLMJudgeRealDialogLikertScore,
    MeanEvaluator, FrequencyEvaluator, StatsEvaluator,
    DatasetComparator
)

# Linguistic analysis
hesitation_score = LinguisticFeatureScore(feature="hesitation-rate")
readability_score = LinguisticFeatureScore(feature="flesch-reading-ease")

# Flow-based evaluation (requires reference dialogues)
flow_evaluator = DialogFlowScore(reference_dialogs)

# LLM-based judgment
realism_judge = LLMJudgeRealDialog(reason=True)
realism_judge_likert = LLMJudgeRealDialogLikertScore()  # 1-5 scale

# Multi-metric comparison across different models
comparator = DatasetComparator([
    FrequencyEvaluator(realism_judge),
    StatsEvaluator(readability_score),
    MeanEvaluator(hesitation_score),
    MeanEvaluator(flow_evaluator)
])

# Evaluate multiple dialog sets
results = comparator({
    "model_A": dialogs_a,
    "model_B": dialogs_b,
    "human_baseline": human_dialogs
})
comparator.plot()
Caching: Some score computations, so a good practice is to enable caching (sdialog.config.cache(True)) to accelerate repeated runs across large corpora.
Interpretability & Steering
SDialog provides advanced tools for mechanistic interpretability and activation steering to understand and control model behavior during dialogue generation.
Activation Inspection:
Let’s start exploring the inner workings of our models! Inspector registers PyTorch forward hooks on specified model layers to capture per-token activations during generation. This allows us to see what’s happening inside the model as it generates responses:
from sdialog.interpretability import Inspector
from sdialog.agents import Agent

# Create agent and inspector
agent = Agent(persona=my_persona)
inspector = Inspector(target='model.layers.15.post_attention_layernorm')

# Attach inspector to agent
agent = agent | inspector

# Generate responses (activations are captured automatically)
response1 = agent("Tell me about the weather")
response2 = agent("What's your favorite color?")

# Access captured activations
print(f"Captured {len(inspector)} responses")
first_token_activation = inspector[-1][0].act  # Last response, first token
print(f"Activation shape: {first_token_activation.shape}")

# Inspect system instructions
inspector.find_instructs(verbose=True)
Activation Steering:
Now for the exciting part—actually steering the model’s behavior! DirectionSteerer enables targeted manipulation of model activations. This means we can guide the model’s responses in specific directions:
import torch
from sdialog.interpretability import DirectionSteerer

# Create a direction vector (e.g., from activation differences)
empathy_direction = torch.randn(4096)  # Model hidden size

# Create steerer and attach to inspector
steerer = DirectionSteerer(empathy_direction)
inspector = inspector + steerer  # Add direction
# or: inspector = inspector - steerer  # Subtract direction

# Generate with steering applied
steered_response = agent("I'm feeling really sad today")

# Compare with baseline
inspector.clear()  # Reset to remove steering
baseline_response = agent("I'm feeling really sad today")
Advanced Usage:
Ready to dive deeper? Here’s how we can inspect multiple layers simultaneously and apply fine-grained steering control:
# Multi-layer inspection
multi_inspector = Inspector({
    'early': 'model.layers.5.post_attention_layernorm',
    'middle': 'model.layers.15.post_attention_layernorm',
    'late': 'model.layers.25.post_attention_layernorm'
},
steering_interval=(0, 2))  # steer only the first two generated tokens

agent = agent | multi_inspector - direction
Audio Generation
The audio module of SDialog extends the core functionality by adding comprehensive audio generation and processing capabilities for dialogues. It enables transforming text dialogues into immersive audio experiences with realistic voices and simulated acoustic environments.
Setup and Installation
To work with audio features in SDialog, you’ll need to install additional dependencies and system packages:
1. Install SDialog with Audio Dependencies
pip install sdialog[audio]
2. Install System Dependencies
Install Sox and FFmpeg for audio processing:
apt-get install sox ffmpeg
3. TTS Engine Setup
HuggingFace TTS: Already included with
sdialog[audio](default TTS engine).Kokoro TTS: Requires installation after
espeak-ngfor phoneme processing:
apt-get install espeak-ng
pip install -q kokoro>=0.9.4
Other TTS Engines: If you plan to use custom TTS engines (e.g., XTTS, IndexTTS), install them manually according to their documentation before use.
Alternatively, a ready-to-use Apptainer image (.sif) with SDialog and all dependencies (including Ollama server, Kokoro TTS, and other TTS engines) is available on Hugging Face and can be downloaded here.
apptainer exec --nv sdialog.sif python3 -c "import sdialog; print(sdialog.__version__)"
Audio Module Overview
The audio module provides:
Audio Generation: Text-to-speech conversion using various TTS engines (Kokoro, IndexTTS or any other TTS engines)
Voice Management: Voice databases with speaker characteristics (gender, age, language, …)
Acoustic Simulation: Realistic room environments with reverberation effects and ray tracing
Audio Pipeline: Complete dialogue processing with turn-based audio generation
Core Components
- AudioDialog (
AudioDialog) Extended dialogue class that inherits from
Dialogand adds audio turn support. It also contains all the information to generate the audio dialogue.- AudioTurn (
AudioTurn) Individual dialogue turns with associated audio metadata. Stores audio files, durations, temporal positions, and voice information.
- TTS (
BaseTTS) Abstract interface for text-to-speech engines. Available implementations: -
KokoroTTS: Kokoro engine for speech synthesis -IndexTTS: IndexTTS engine -HuggingFaceTTS: Generic implementation for models from the Hugging Face Hub - Any other TTS engine that inherits fromBaseTTS- Voice Databases (
BaseVoiceDatabase) Voice management with speaker metadata (gender, age, language, …). Implementations: -
HuggingfaceVoiceDatabase: Voices gathered from Hugging Face -LocalVoiceDatabase: Local database of voices - Any other voice database that inherits fromBaseVoiceDatabase- Acoustic Simulation (
AcousticsSimulator) Realistic acoustic environment simulation with: -
Room: 3D room specifications with furniture, speakers, microphones, … -RoomGenerator: Automatic room generation with customizable dimensions and aspect ratios. Two implementations are available:BasicRoomGeneratorandMedicalRoomGenerator. - Integration with dSCAPER for timeline generation and pyroomacoustics for acoustic simulation of the room.- Impulse Response Databases (
ImpulseResponseDatabase) Impulse response management for microphone effect simulation. Implementations: -
HuggingfaceImpulseResponseDatabase: IRs gathered from Hugging Face -LocalImpulseResponseDatabase: Local IR database - Any other impulse response database that inherits fromImpulseResponseDatabase- Audio Processor (
AudioProcessor) Applies audio effects, such as microphone simulation by convolving audio with an impulse response from an impulse response database.
Quick Usage
For simple use cases, SDialog provides convenient one-function audio generation:
Using the `to_audio` utility function:
from sdialog.audio.pipeline import to_audio

# Generate complete audio in one call
audio_dialog = to_audio(
    original_dialog,
    perform_room_acoustics=True,
    audio_file_format="mp3"  # or "wav", "flac"
)

# Access generated files
print(f"Combined audio: {audio_dialog.audio_step_1_filepath}")
print(f"Timeline audio: {audio_dialog.audio_step_2_filepath}")
print(f"Room acoustics: {audio_dialog.audio_step_3_filepaths}")
Using Dialog’s built-in method:
# Convert dialog directly to audio
audio_dialog = original_dialog.to_audio(
    perform_room_acoustics=True
)

# Access generated files
print(f"Combined audio: {audio_dialog.audio_step_1_filepath}")
print(f"Timeline audio: {audio_dialog.audio_step_2_filepath}")
print(f"Room acoustics: {audio_dialog.audio_step_3_filepaths}")
Complete Usage Example
Here’s how to create a complete audio dialogue with environment simulation using the audio pipeline:
from sdialog.audio import AudioDialog, KokoroTTS, HuggingfaceVoiceDatabase
from sdialog.audio.pipeline import AudioPipeline
from sdialog.audio.room import DirectivityType
from sdialog.audio.utils import SourceVolume, SourceType
from sdialog.audio.jsalt import MedicalRoomGenerator, RoomRole, RoomPosition
from sdialog.personas import Persona
from sdialog.agents import Agent

# 1. Create a base text dialogue
doctor = Persona(name="Dr. Smith", role="doctor", age=40, gender="male", language="english")
patient = Persona(name="John", role="patient", age=45, gender="male", language="english")

doctor_agent = Agent(persona=doctor)
patient_agent = Agent(persona=patient, first_utterance="Hello doctor, I have chest pain.")

dialog = patient_agent.dialog_with(doctor_agent, max_turns=6)

# 2. Convert to audio dialogue
audio_dialog = AudioDialog.from_dialog(dialog)

# 3. Configure TTS engine and voice database
tts_engine = KokoroTTS(lang_code="a")  # American English
voice_database = HuggingfaceVoiceDatabase("sdialog/voices-kokoro")

# 4. Setup audio pipeline
audio_pipeline = AudioPipeline(
    voice_database=voice_database,
    tts_engine=tts_engine,
    dir_audio="./audio_outputs"
)

# 5. Generate a medical examination room
room = MedicalRoomGenerator().generate(args={"room_type": RoomRole.EXAMINATION})

# 6. Position speakers around furniture in the room
room.place_speaker_around_furniture(
    speaker_name="speaker_1",
    furniture_name="desk",
    max_distance=1.0
)
room.place_speaker_around_furniture(
    speaker_name="speaker_2",
    furniture_name="desk",
    max_distance=1.0
)

# 7. Set microphone directivity
room.set_directivity(direction=DirectivityType.OMNIDIRECTIONAL)

# 8. Run the complete audio pipeline
audio_dialog = audio_pipeline.inference(
    audio_dialog,
    environment={
        "room": room,
        "background_effect": "white_noise",
        "foreground_effect": "ac_noise_minimal",
        "source_volumes": {
            SourceType.ROOM: SourceVolume.HIGH,
            SourceType.BACKGROUND: SourceVolume.VERY_LOW
        },
        "kwargs_pyroom": {
            "ray_tracing": True,
            "air_absorption": True
        }
    },
    perform_room_acoustics=True,
    dialog_dir_name="medical_consultation",
    room_name="examination_room"
)

# 9. Access the generated audio files
print(f"Combined utterances: {audio_dialog.audio_step_1_filepath}")
print(f"DScaper timeline: {audio_dialog.audio_step_2_filepath}")
print(f"Room acoustics simulation: {audio_dialog.audio_step_3_filepaths}")
Room Generation and Configuration
SDialog provides powerful room generation capabilities for creating realistic acoustic environments:
Medical Room Generator - Create specialized medical environments:
from sdialog.audio.jsalt import MedicalRoomGenerator, RoomRole

# Generate different types of medical rooms
generator = MedicalRoomGenerator()

# Various medical room types
consultation_room = generator.generate({"room_type": RoomRole.CONSULTATION})
examination_room = generator.generate({"room_type": RoomRole.EXAMINATION})
# ... other room types ...

# Get room properties
print(f"Room area: {examination_room.get_square_meters():.1f} m²")
print(f"Room volume: {examination_room.get_volume():.1f} m³")
Basic Room Generator - Create simple rectangular rooms:
from sdialog.audio.room_generator import BasicRoomGenerator

# Generate rooms with different sizes
generator = BasicRoomGenerator(seed=123)  # For reproducible results

small_room = generator.generate({"room_size": 8})   # 8 m²
large_room = generator.generate({"room_size": 20})  # 20 m²

print(f"Small room: {small_room.get_square_meters():.1f} m²")
print(f"Large room: {large_room.get_square_meters():.1f} m²")
Room Visualization - Visualize room layouts and configurations:
# Generate and visualize a room
room = MedicalRoomGenerator().generate({"room_type": RoomRole.EXAMINATION})

# Create detailed visualization
img = room.to_image(
    show_anchors=True,
    show_walls=True,
    show_furnitures=True,
    show_speakers=True,
    show_microphones=True
)

# Display or save the image
img.show()  # Display in notebook
img.save("room_layout.png")  # Save to file
Custom Room Generator - Create specialized room types:
from sdialog.audio.room import Room
from sdialog.audio.utils import Furniture, RGBAColor
from sdialog.audio.room_generator import RoomGenerator, Dimensions3D

class WarehouseRoomGenerator(RoomGenerator):
    def __init__(self):
        super().__init__()
        self.ROOM_SIZES = {
            "big_warehouse": ([1000, 2500], 0.47, "big_warehouse"),
            "small_warehouse": ([100, 200, 300], 0.75, "small_warehouse"),
        }

    def generate(self, args):
        warehouse_type = args["warehouse_type"]
        floor_area, reverberation_ratio, name = self.ROOM_SIZES[warehouse_type]

        # Calculate dimensions
        dims = Dimensions3D(width=20, length=25, height=10)

        room = Room(
            name=f"Warehouse: {name}",
            dimensions=dims,
            reverberation_time_ratio=reverberation_ratio,
            furnitures={
                "door": Furniture(
                    name="door",
                    x=0.10, y=0.10,
                    width=0.70, height=2.10, depth=0.5
                )
            }
        )
        return room

# Use custom generator
warehouse_gen = WarehouseRoomGenerator()
warehouse = warehouse_gen.generate({"warehouse_type": "big_warehouse"})
Microphone Positioning - Configure microphone placement:
from sdialog.audio.room import MicrophonePosition, Position3D

# Different microphone positions
room = Room(
    name="Demo Room",
    dimensions=Dimensions3D(width=10, length=10, height=3),
    mic_position=MicrophonePosition.CHEST_POCKET_SPEAKER_1
)

# Position microphone on desk
room_with_desk = Room(
    name="Office Room",
    dimensions=Dimensions3D(width=5, length=4, height=3),
    mic_position=MicrophonePosition.DESK_SMARTPHONE,
    furnitures={
        "desk": Furniture(
            name="desk",
            x=2.0, y=2.0,
            width=1.5, height=0.8, depth=1.0,
            color=RGBAColor.BROWN
        )
    }
)

# Custom 3D position
room_custom = Room(
    name="Custom Mic Room",
    dimensions=Dimensions3D(width=8, length=6, height=3),
    mic_position=MicrophonePosition.CUSTOM,
    mic_position_3d=Position3D(x=4.0, y=3.0, z=1.5)
)
Speaker and Furniture Placement - Position speakers around furniture:
from sdialog.audio.utils import SpeakerSide, Role

room = Room(
    name="Demo Room with Speakers and Furniture",
    dimensions=Dimensions3D(width=10, length=10, height=3),
    mic_position=MicrophonePosition.CEILING_CENTERED
)

# Add furniture to room
room.add_furnitures({
    "lamp": Furniture(
        name="lamp",
        x=6.5, y=1.5,
        width=0.72, height=1.3, depth=0.72
    ),
    "chair": Furniture(
        name="chair",
        x=2.5, y=4.5,
        width=0.2, height=1.3, depth=0.2
    )
})

# Position speakers around furniture
room.place_speaker_around_furniture(
    speaker_name=Role.SPEAKER_1,
    furniture_name="lamp"
)
room.place_speaker_around_furniture(
    speaker_name=Role.SPEAKER_2,
    furniture_name="chair",
    max_distance=2.0,
    side=SpeakerSide.BACK
)

# Calculate distances
distances = room.get_speaker_distances_to_microphone(dimensions=2)
print(f"Speaker 2D distances to the microphone: {distances}")
Voice Database Management
SDialog supports multiple voice database types for flexible voice selection:
HuggingFace Voice Databases - Use pre-trained voice collections:
from sdialog.audio.voice_database import HuggingfaceVoiceDatabase

# LibriTTS voices
voices_libritts = HuggingfaceVoiceDatabase("sdialog/voices-libritts")

# Kokoro voices
voices_kokoro = HuggingfaceVoiceDatabase("sdialog/voices-kokoro")

# Get voice statistics
print(voices_kokoro.get_statistics(pretty=True))

# Select voices based on characteristics
female_voice = voices_libritts.get_voice(gender="female", age=25, seed=42)
# Prevent voice reuse
male_voice = voices_libritts.get_voice(gender="male", age=30, keep_duplicate=False)

# Reset used voices for reuse
voices_libritts.reset_used_voices()
Local Voice Databases - Use your own voice files:
from sdialog.audio.voice_database import LocalVoiceDatabase

# Create database from local files with CSV metadata
voice_database = LocalVoiceDatabase(
    directory_audios="./my_custom_voices/",
    metadata_file="./my_custom_voices/metadata.csv"
)

# Add custom voices programmatically
voice_database.add_voice(
    gender="female",
    age=42,
    identifier="french_female_42",
    voice="./my_custom_voices/french_female_42.wav",
    lang="french",
    language_code="f"
)

# Get voice by language and prevent voice reuse (it will give you the closest age for the specified gender)
french_voice = voice_database.get_voice(gender="female", age=20, lang="french", keep_duplicate=False)

# Get statistics
print(voice_database.get_statistics(pretty=True))
Quick Voice Database - Create databases from dictionaries:
from sdialog.audio.voice_database import VoiceDatabase

# Create database from predefined voice list
quick_voices = VoiceDatabase(
    data=[
        {
            "voice": "am_echo",
            "language": "english",
            "language_code": "a",
            "identifier": "am_echo",
            "gender": "male",
            "age": 20
        },
        {
            "voice": "af_heart",
            "language": "english",
            "language_code": "a",
            "identifier": "af_heart",
            "gender": "female",
            "age": 25
        }
    ]
)

# Use the voices
male_voice = quick_voices.get_voice(gender="male", age=20)
female_voice = quick_voices.get_voice(gender="female", age=25)

# Unavailable voice for this language (an error will be raised)
female_voice_spanish = quick_voices.get_voice(gender="female", age=25, lang="spanish")
Microphone Effects
SDialog allows you to simulate various microphone effects by applying impulse responses to your generated audio. This is useful for creating more realistic audio by simulating different recording environments and devices.
from sdialog.audio.processing import AudioProcessor
from sdialog.audio.impulse_response_database import LocalImpulseResponseDatabase, RecordingDevice
import soundfile as sf
import numpy as np

# Create dummy files for the example
with open("metadata.csv", "w") as f:
    f.write("identifier,file_name\\n")
    f.write("my_ir,my_ir.wav\\n")
sf.write("my_ir.wav", np.random.randn(16000), 16000)
sf.write("input.wav", np.random.randn(16000 * 3), 16000)

# Use a local impulse response database
ir_db = LocalImpulseResponseDatabase(metadata_file="metadata.csv", directory=".")

# Apply a microphone effect
AudioProcessor.apply_microphone_effect(
    input_audio_path="input.wav",
    output_audio_path="output.wav",
    device=RecordingDevice.SHURE_SM57,  # Or a custom device identifier like "my_ir"
    impulse_response_database=ir_db
)
Multilingual Audio Generation
SDialog supports multilingual audio generation with custom TTS engines:
Custom TTS Engine - Create your own TTS implementation:
import torch
import numpy as np
from sdialog.audio.dialog import AudioDialog
from sdialog.audio.tts import BaseTTS
from sdialog.audio.pipeline import AudioPipeline
from sdialog.audio.voice_database import LocalVoiceDatabase

class XTTSEngine(BaseTTS):
    def __init__(self, lang_code: str = "en", model="xtts_v2"):
        from TTS.api import TTS
        self.lang_code = lang_code
        self.pipeline = TTS(model).to("cuda" if torch.cuda.is_available() else "cpu")

    def generate(self, text: str, speaker_voice: str, tts_pipeline_kwargs: dict = {}) -> tuple[np.ndarray, int]:
        wav_data = self.pipeline.tts(
            text=text,
            speaker_wav=speaker_voice,
            language=self.lang_code
        )
        return (wav_data, 24000)

# Use custom TTS for Spanish
spanish_tts = XTTSEngine(lang_code="es")

# Create spanish voice database
spanish_voices = LocalVoiceDatabase(
    directory_audios="./spanish_voices/",
    metadata_file="./spanish_voices/metadata.csv"
)

# Generate Spanish audio
audio_pipeline = AudioPipeline(
    voice_database=spanish_voices,
    tts_engine=spanish_tts,
    dir_audio="./spanish_audio_outputs"
)
Language-specific Voice Assignment:
from sdialog.audio.utils import Role

# Assign specific voices from your voice database for different languages
spanish_voices = {
    Role.SPEAKER_1: ("spanish_male_1", "spanish"),
    Role.SPEAKER_2: ("spanish_female_1", "spanish")
}

spanish_audio = audio_pipeline.inference(
    spanish_dialog,
    voices=spanish_voices
)
Configuration & Control
Configuration Layer
Centralized configuration lives in sdialog.config:
Default LLM settings:
llm(),llm_params()Cache management:
cache()/cache_path()/set_cache().Prompt overrides:
set_persona_dialog_generator_prompt(),set_persona_generator_prompt(),set_dialog_generator_prompt(),set_persona_agent_prompt().
Supported Backend Formats:
openai:MODEL- OpenAI models (GPT-3.5, GPT-4, etc.)huggingface:MODEL- HuggingFace transformers modelsollama:MODEL- Local/remote Ollama modelsamazon:MODELoraws:MODEL- AWS Bedrock models (Anthropic Claude, etc.)google:MODELorgoogle-genai:MODEL- Google Gen AI models (Gemini, etc.)anthropic:MODEL- Anthropic API models (Claude, etc.)azure:MODELorazure-openai:MODEL- Azure OpenAI modelsLocal model instances passed directly
Configuration Examples:
Let’s configure SDialog to work with your preferred LLM backend. Here are some common configuration patterns:
import sdialog.config as config

# Set global LLM backend and model with specific parameters
config.llm("openai:gpt-4",
           temperature=0.7,
           max_tokens=1000)

# Use local Ollama model with default parameters
config.llm("ollama:llama2")

# Configure Amazon Bedrock with default parameters
# plus specific temperature value
config.llm("amazon:anthropic.claude-v2",
           temperature=0.5)

# Enable evaluation caching with default parameters
config.cache(True)

# Enable caching in specific path
config.set_cache("/path/to/cache", enable=True)
Component-Level Overrides:
Any component that uses LLMs (Agents, Generators, Judges, Orchestrators) accepts model followed by its parameters to override global config on a per-instance basis.
from sdialog.agents import Agent

# Create an agent with custom model and parameters
custom_agent = Agent(
    name="CustomAgent",
    model="ollama:llama3",
    temperature=0.7,
    base_url="http://localhost:11434"
)
For instance, you can set a default model globally that fits your GPU via sdialog.config.llm(), and then override specific components, like an LLM-as-a-Judge to use a powerful API-based model as a judge (e.g. OpenAI models).
Tools & Function Calling
Provide a list of Python callables to an Agent via tools=[fn_a, fn_b]. For backends that expose tool/function-calling semantics, outputs may be (a) executed and inserted into memory, (b) used to refine final completions depending on backend support. Ensure return values are JSON-serializable.
Thinking Segments
If think=True on Agent (and backend supports surrogate reasoning tokens), SDialog can preserve or strip these segments. If not natively supported by the underlying, SDialog can still recognize thinking segments using the provided value in thinking_pattern (regex capturing group). Suitable for experiments analyzing chain-of-thought style reasoning without leaking it downstream.
Extensibility & I/O
Serialization & Persistence
All core objects support JSON serialization with metadata. Typical patterns:
dialog.to_file("session.json")
restored = Dialog.from_file("session.json")

context.to_file("ccontext.json")
restored = context.from_file("ccontext.json")

persona.to_file("persona.json")
restored = Persona.from_file("persona.json")
For plain text or CSV import/export: to_file() (type='auto'|'txt'|'csv'|'json'); similarly from_file() (type='auto'|'txt'|'csv'|'json'). The default is 'auto' (infers the format from the file extension).
Extensibility Patterns
Create new components by subclassing:
Persona variants → subclass
BasePersona.Orchestrator → implement
instruct(dialog, utterance).Persistent Orchestrator → subclass
BasePersistentOrchestrator.Dialog Score → subclass
BaseDialogScoreimplementingscore(dialog).Dataset Score Evaluator → subclass
BaseDatasetScoreEvaluatorimplementing__eval__(and optional__plot__).Embedding Evaluator → subclass
BaseDatasetEmbeddingEvaluatorimplementing__eval__(+__plot__for visualization).LLM Judge → subclass
BaseLLMJudgeimplementingjudge(dialogs).
Operations & Recipes
Testing & Reproducibility Tips
Use
prompt()to get the underlying prompt sent to the LLM for any LLM-dependant component (Agent and generators) for paper reporting.Use
json()to export any LLM-dependant component (Agent, Persona, Context, Generators) for reproducibility.Use
clone()to derive variations while preserving ancestry for auditing/controllability.Cache expensive score computations (flow graph building, embedding passes) across experimental sweeps.
Performance Considerations
Batch evaluation: Pre-build flow graphs once (reuse in multiple scorers) or supply precomputed
graph/nodesto Flow scores.Embedding evaluators: Control batch size & device in SentenceTransformer / BERT evaluators to optimize GPU utilization.
Caching: Enable disk cache for repeated LLMJudge or flow evaluations over large static corpora.
Common Recipes
Generate Multi-Variant Persona Set:
PersonaGeneratorwith rule lists and numeric ranges + seed cycle.Scenario Simulation at Scale: For each scenario → build Agents → attach orchestrators → run
dialog_withfor N seeds.Quality Filtering Pipeline: Generate dialogs → apply LLM judges (realism > threshold) → compute flow score percentile → retain top quantile.
Style Harmonization: Paraphrase dialogs targeting only system speaker with controlled extra instructions.
Activation Steering Study: Attach
Inspector→ collect baseline activations → compute direction (e.g., mean difference) → applyDirectionSteerer→ compare linguistic + refusal metrics pre/post.